So as I was browsing my wedding itinerary, I thought for a second and got all excited.
Maybe I should DIY my bunga telur!
You know, the individual sticks where usually its just some ugly glitter2 manik2, fake and hard thingy, something like this,

Eww. sungguh aku tak berkenan. very makcik2 you know.
So I was thinking of smtg easy. Either way I dont think I really have to make a lot of Bunga Telur right? usually 1 stand can fit 40-50sticks. so usually on the dais itself there will be 2 stands on either side of the couple, so tt makes it 100 sticks.
FAIR ENOUGH.
So a few came into my mind. Stuffs like origami, felt paper, fabric flowers, paper flowers.
And when I reached paper flowers, suddenly Flower Pompoms came right in.
FLOWER POMPOMS are perfect!
Alternatively, i can get the ones at Daiso but they usually runs out fast.
Crepe paper is fine too, and it costs like 70cents per packet. i can make around 10 medium pompoms with just 1 packet of crepe paper.
So the ideas are running wild. Kalau boleh itu jam jugak nak pergi mustapha beli and straight away buat. Haha.
But i figured, i could prolly finish all 100 sticks in 1 weekend when Im working since theres really nthg to do.
So, basically I will provide you with an illustration on how to DIY your own Bunga Telur by using Flower PomPoms.
You will need:
Crepe paper/coloured tissue paper
fabric wire
scissors
satay sticks
nets (to place the egg in) you can get this over in JB, they're selling them at 100pcs for RM8. very very cheap.
glue gun or super glue if you dont have one.
white tape
bunga telur stand (advisable to have 2 over both left n right, having just 1 looks funny, i think)
pretty easy and cheap items right? So of course, you need to be very patient with the doing of the Pompoms. I didnt get it the first time its quite a challenge because of the poofing and layering. but you'll get to it, eventually. :)
Below are illustrations on how you make the Pompoms. Pretty straight forward. Suggest that you try out with a crepe paper instead.

Take note: The lesser the diameter of the folds, the poofer your pompoms will be.
You catching up? Pretty simple right.
The next few steps are the most important ones because this involves the poofing of your pompom.
You need to be extra careful wth tissue papers because they tears easy.
As for crepe papers, you need to have thinner folds because crepe's usually wont have the volume.
Thus thinner folds means fuller pompoms. :)
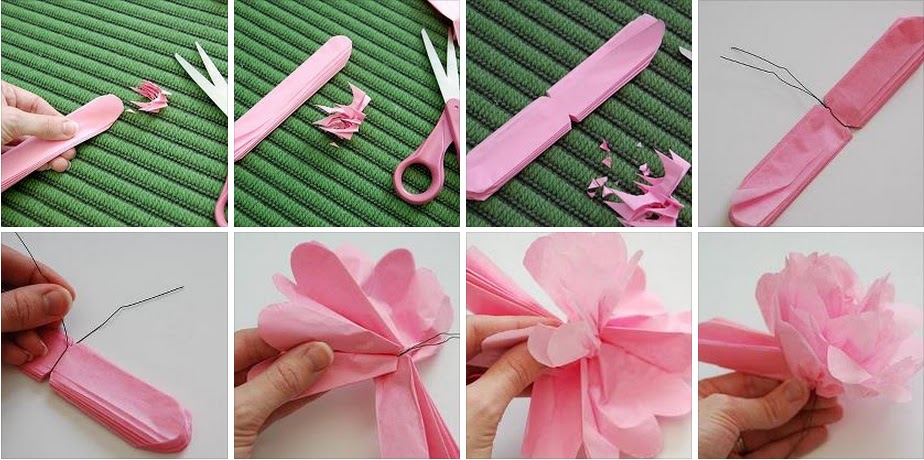
When you're done poofing all the layers all around, it will look like this.

You can continue doing more individual pompoms but i prefer completing it by sets.
So, I will finish this off by adding the satay stick, and then the net. :)
Poofing the layers can get pretty tiring. :(
But the results are just sooo pretty.
Do play with colours.
When you're done, your flower pompom/bunga telur will look like this individually

Credits to Dyan :)


Credits to Chubby Bride :)
You can add labels, like the one above, or ribbons. Whatever you like ya?
So now you can just purchase those Bunga Telur stands, usually comes in gold or silver. And the're really cheap in JB (RM15/stand) or here in SG ($10/stand).

NOW you can do the honors of sticking in the individual pompoms into the holes provided. Like mentioned, per stand would usually hold 40-50 bunga telur.
End products would look like this.


Remember when I say to play with colours? THIS is why.
Since I am follwing my colour theme for the bunga telur, I had Seni Qanasuri as reference.
I don't think I can go wrong with pastel pink and tiff blue.
Gorgeous.

Happy DIY!